" Blog da Horta Biológica: Kitchen
Mostrar mensagens com a etiqueta Kitchen. Mostrar todas as mensagens

Lemon Curd | 3 Ingredients | Dairy Free | Sugar Free | Quick, Easy and Healthy Recipe

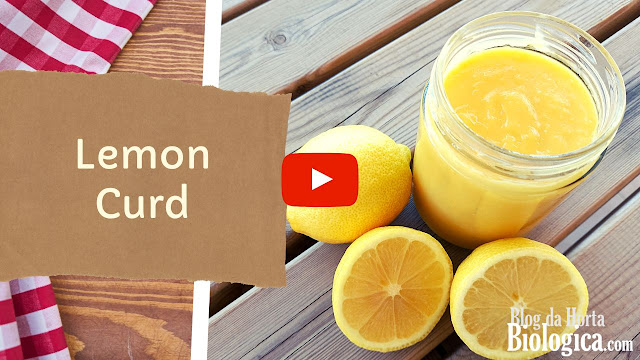
It's lemon harvest season again! Here on our blog, we've talked a lot about this wonderful and versatile fruit that always presents us with abundance. Sometimes there is so much lemon that we really have to use our imagination for using it all. From cooking to natural remedies, from detergents to cosmetics, among many other things, anything can be made with lemon. During the summer, we're really in the mood for a fresh, citrusy treat! That's why we're going to share our version of lemon curd, with 3 ingredients only, no sugar, and no butter. Healthy, super easy, and quick to make.  At the end of the post you can also watch our educational video where we show you how to make this recipe, step by step.

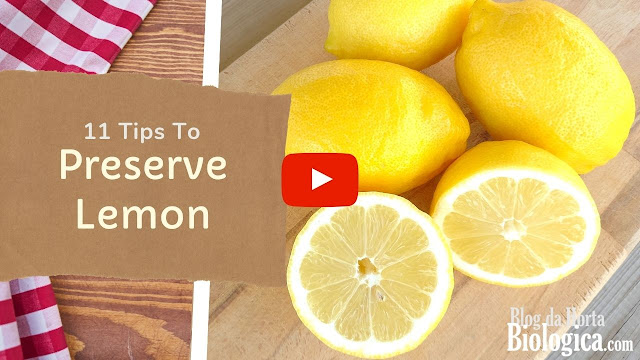
If you have much lemon and don't have time to prep recipes, you might like our post and video: 11 Tips To Preserve Lemon.


What is Lemon Curd Anyway?


"Lemon Curd" is a very old delicacy with British origins. It's a sweet, creamy paste originally made with lemon, eggs, sugar, and butter. It is commonly used for filling or topping cakes, but also for spreading on biscuits, toast, bread, or adding to other confectionery recipes. The word "curd" seems to be related to the thick, creamy texture that is obtained by cooking the ingredients. Nowadays, lemon curd is very popular all over the world and is yet another excellent way of using lemon!


Our Version of Lemon Curd


At home we like to come up with new stuff but we also like to make things simple. We wanted to make a lemon curd that was easy, quick, had few ingredients, and no sugar nor butter. So we chose just 3 vital ingredients for this recipe: lemon, eggs, and honey. The honey has to be multifloral and mild so that the cream is balanced and doesn't take on a strong flavor. We used honey from our own production. If you're curious to know what it's like to produce honey, check out our post and video: Harvesting and Extraction of Raw Honey. So let's jump into the recipe!


Ingredients


  • 4 eggs (we used a mixture of duck and chicken eggs)
  • 1/2 cup honey (remember it has to be multifloral and mild in flavor)
  • 1/2 cup lemon juice (the number of lemons needed varies)
  • Zest of 2 medium lemons

This recipe yields about 350g (12.34oz) of lemon curd. The quantity will always vary according to the size of the eggs and the final thickness of the curd.


How To Make It


  1. In a large bowl, add the eggs (yolk and white) and whisk until well blended.
  2. Add the zest, lemon juice and honey, and mix well.
  3. Add the mixture to a pan and cook over a low heat, stirring constantly, until it thickens. For us it took about 5 minutes to thicken (the time may vary depending on the power of the stove).
  4. As soon as the mixture has thickened enough to cover the spoon without spilling back into the pan, remove from the heat.
  5. Leave to cool slightly before pouring into a previously sterilized jar.
  6. Once cool, store in the fridge.
  7. The leftovers from this recipe (egg shells and lemon mesocarp) can be composted or reused. To find out how to use or preserve the mesocarp, see this post. To find out how to reuse eggshells, here's another tip: Natural Plant Fertilizer.


How To Use


You can use lemon curd on anything you can think of! 

Here are some tips:

  • Filling or topping cakes or cheesecake
  • Spread on cookies, toast, and biscuits
  • Add to other confectionery preparations such as pies, crepes, croissants, scones, tarts, desserts, etc
  • Add to natural yoghurt
  • Eat by the spoonful!


How To Store


It should be stored in the fridge for up to 2 weeks or until you start to notice a change in texture, color or smell. However, this is unlikely to happen... this lemon curd is so good that it shouldn't last long before it's gone! :) 


Have a look at our video where we show you everything in detail!


VIDEO - Lemon Curd | 3 Ingredients | Dairy Free | Sugar Free | Quick, Easy and Healthy Recipe


How To Make Indian Chai

Chai, also known as Masala Chai, is a very aromatic, comforting and traditional Indian drink. I, Ana, came to know this drink on a trip to India a few years ago and I liked it so much that, since then, every year when the cold weather arrives I like to prepare this drink at home. Besides bringing me strong and beautiful memories of India, Luís also enjoys this drink, so there is no way not to make it. At the end of this post also watch our video with the step by step instructions for making Chai.


The word Chai means "tea" in many Asian countries. In India, any time of the day is a good time to drink Chai. Even on the street you can easily find people selling this drink. Chai is not just tea. It is a mixture of tea with milk, sweetener, herbs and eastern spices. Both the ingredients and the way Chai is made vary greatly in each region of India. 


The recipe we are sharing in this post is just a suggestion, and you can change the recipe to your liking. Making this drink is a great opportunity to use herbs grown in the garden or to try new flavors.


Ingredients


Method

  1. In a pan or kettle, add the water, cinnamon stick, cardamom powder, star anise, ginger powder and fennel seeds.
  2. Stir and let boil for 10 minutes.
  3. Add the milk and sugar and bring to a boil again. 
  4. When it starts boiling, lower the heat to the minimum and let simmer for 5 minutes.
  5. Turn off the heat, add the black tea leaves, stir and let it infuse for 8 minutes.
  6. Strain the liquid and drink immediately.


Our Special Tips

  • The recipe can be altered to one's taste. Spices, sweetener and tea can all be different. A brief example: fennel seeds can be replaced with anise powder, black tea can be replaced with green tea, and sugar can be replaced with condensed milk. There is no fixed way to make Chai.
  • Chai is excellent together with cookies or to simply drink it alone. We recommend having it together with anise cakes which are very aromatic as well.
  • This drink is stimulating and can cause difficulty sleeping, so we don't recommend drinking it before bedtime.


And why not trying this recipe to use the herbs from your garden in a different way?

We hope you enjoy this recipe! Have a look at our video on our YouTube channel.


VIDEO - How To Make Indian Chai


How To Make Almond Milk | Natural | No Additives

In the season of dry fruits, we bring you some more tips for consumption...this time of almonds! In the last post we shared our recipe for Hazelnut Cream. In this post we will talk about homemade almond milk, made without any additives. Almond milk is flavorful, pleasant tasting and is also suitable for those who are lactose intolerant. For its benefits it is well worth making, if only to vary the usual consumer products. At the end of the post also watch our video with the step by step instructions to make this vegetable drink.


So let's see how to prepare almond milk!


Kitchen Tools

  • 1 Container for soaking the almonds
  • 1 Sieve or strainer to remove the water from the almonds
  • 1 Blender
  • 1 Nut Milk Bag
  • 1 Container for straining the milk
  • 1 Bottle or glass jar for storing the milk


Ingredients

  • Raw almonds: 200g (7.05oz)
  • Water as needed to soak the almonds
  • Water: 900ml (30.43oz) to mix with the almonds in the blender

These quantities will yield almost 1L (33.81oz) of almond milk.


Method

  1. Place the almonds in a container with water and let soak for 8-12 hours.
  2. Using a sieve or colander, drain out the water and wash the almonds.
  3. Place the almonds in a blender and add 900ml (30.43oz) water.
  4. Blend for 3 minutes.
  5. Using a nut milk bag, strain the liquid into a container.
  6. From this container, transfer to a bottle or glass jar. 

It is ready to drink!

Keep in the fridge and consume within 3 days.


What to Do With Almond Leftovers?

The almond leftovers in the nut milk bag can and should be reused in order to avoid wasting this precious food. Here are just a few tips for reuse and preservation:

  • Almond flour
  • Cake fillings
  • Candy toppings
  • Mix in yogurt
  • Almond cream
  • Almond butter


Our Special Tips

  • We use 900ml (30.43oz) water for 200g (7.05oz) almonds. If you want a thinner milk, you can add more water. If you want a thicker milk, add less water. 
  • To make almond flour, dehydrate in the oven for about 15 minutes at 60°C (140ºF). Once dehydrated, use a coffee bean grinder to grind more finely. Sieve and store the flour in an airtight jar.
  • For short-term use, the leftovers can be stored in the fridge.
  • If you don't know yet when you will use the leftovers, we recommend freezing them in individual portions (for example in ice cube trays) for later use.
  • To make vegetable butter, it is advisable to use it immediately after making the milk. Just put it in a food processor and continue to grind until it becomes creamy in texture. It is necessary to clean the walls of the bowl of the processor to ensure that the butter is well mixed. The time until it becomes creamy is variable, depending on the power of the machine.
  • If you are wondering what the difference between butter and cream is, here it goes: butter is made only with almonds, with no other additives. Cream can take all the additives you like to get a treat. Some examples of additives: vegetable milks, cocoa, coffee, yogurt, honey, cinnamon, etc... Visit our post Hazelnut Cream to have an example.


We hope you enjoy all our tips! 

Have a look at our video where we show you all the details and if you haven't subscribed to our YouTube channel yet, take the opportunity to do so if you don't want to miss a thing!


Hazelnut Cream | Homemade Nutella without Sugar and Chocolate | Simple and Healthy Recipe

Hazelnut is a dry fruit, delicious, nutritious, and healthy. The end of summer is hazelnuts season and, whether harvested or purchased, it's always good to have ideas for using them to delight everyone. That is why today we are going to share our recipe for hazelnut cream, which many people call "homemade nutella". There are many hazelnut cream recipes but, as always, we like to create and do things our way, so we will show you how we make our quick and healthy "nutella" with no sugar and no chocolate. At the end of the post also watch our video with the step by step of this recipe.


Let's get to the point!


Ingredients

  • 400g raw hazelnuts with skin. If you bought hazelnuts in the shell you might like to watch our post/video "How to Peel Hazelnuts Easily"
  • 5g raw cocoa powder
  • 180ml hazelnut milk
  • 15ml coconut oil (must be liquid)
  • 45ml raw honey

These quantities yield about 500g of hazelnut cream.


Method

  1. Put the hazelnuts in a food processor and grind until creamy. 
  2. To the cream add the cocoa, hazelnut milk, coconut oil, and honey.
  3. Mix everything together.
  4. Pour into a jar.
  5. It doesn't need to be kept in cold storage unless it will take a long time to be consumed...which is not very likely :) 


Our Special Tips

  • The honey used should be multi-flower and should taste just like honey! If you use honey with a strong aftertaste, the cream may taste unpalatable.
  • When grinding, you need a lot of patience! Only grind for a few seconds at a time and open the lid to clean the walls with a spatula and push the ground hazelnuts to the bottom. The total grinding time will depend on the machine power.
  • This recipe gives a thick cream, ideal for spreading. If you want the cream more liquid, we advise adding 1 TBSP of hazelnut milk at a time until you get the desired texture.
  • The amount of honey is sufficient for a lightly sweet cream, in order to avoid abusing. However, if you want a sweeter cream, we advise adding 1 tsp of honey at a time until you get the desired sweetness.


We hope you enjoy our recipe and our tips. Now take a look at the video where we show you all the details.


Happy eating!


VIDEO - Hazelnut Cream | Homemade Nutella without Sugar and Chocolate | Simple and Healthy Recipe


Lemon Jam | Delicious, Simple and Quick | Homemade Recipe

Lemon can only be one of nature's wonders! We have already shared many tips here on the blog on how to use and how to preserve lemon. Today we will share our recipe for homemade jam with this beloved fruit. Delicious, simple and quick to make!

When harvest time comes and there is a lot of lemon to use, you have to use your creativity too! Dissatisfied with the results of other recipes we found on the internet, we got to work and created our own recipe. The result was just the way we wanted it: a smooth, creamy and balanced-tasting jam. Neither too sweet nor too sour. This recipe is the delicious result after much trial and error, so we hope you enjoy it! 

At the end of the post, also watch our educational video with step-by-step instructions for this recipe.


Everything can be done with lemon! Besides being one of the anti-inflammatory foods, it is also widely used in confectionery. We've already shared our lemon ice cream recipe and today it's jam day! Besides its versatility, lemon cultivation is also within everyone's reach. Did you know that even if you live in an apartment you can grow it? Learn more in our book "The 5 C's of Aromatic and Medicinal Plants | Cultivate, Care, Collect, Conserve and Consume | 30 Plants and Their Properties".


Now, let's jump into the recipe:


Ingredients

  • Brown sugar: 500g (17.63 oz)
  • Lemon juice and pulp: 200g (7.05 oz) (the amount of lemons to make 200g of juice varies, depending on the size of the fruit)
  • Eggs: 2 (yolk and white)
  • Cow's milk: as needed (variable amount according to the lemon acidity)
  • Lemon zest: to taste (we used the zest of 1 lemon, but you can add more, less, or none at all depending on your personal taste)


Kitchen Tools

  • 1 Kitchen scale
  • 1 Cutting board
  • 1 Knife
  • 1 Fruit peeler
  • 1 Citrus juicer
  • 1 Pan
  • 1 Wooden spoon
  • 3 Bowls
  • 1 Hand mixer
  • Previously sterilized jars


Method

Part 1 - Prep All The Ingredients

  1. With a fruit peeler, remove the peel from 1 lemon (just the yellow part).
  2. Put the peel in a food processor and grind.
  3. Weigh 500g (17.63 oz) of brown sugar.
  4. Mix the zest with the sugar and set aside.
  5. Squeeze the lemons. Do not throw away the mesocarp (white part). Read our post 11 Tips To Preserve Lemon to learn how to preserve all parts of this fruit.
  6. Remove any remaining seeds and weigh the juice with the pulp.
  7. Add cow's milk to the juice, mix well and set aside. Cow's milk helps to reduce the acidity of the lemon. Our special tip: add 1 TBSP of milk at a time and taste a little of the juice. If it is still too acidic, add a little more milk. For us 3 TBSP of milk was enough. If the juice is too acidic, more milk will be needed.
  8. Beat 2 eggs (yolk + white) by hand and set aside. The egg gives the jam a creamy consistency.


Part 2 - Gather All The Ingredients

  1. In a deep pan, add all the ingredients: the lemon juice already mixed with the milk + the sugar already mixed with the zest + the eggs already beaten.
  2. Mix everything very well. 
  3. Turn on the stove and cook over low heat, stirring occasionally.
  4. When it boils, wait 20 minutes, stirring constantly. Another special tip: if it boils less time the jam will be too liquid. If it boils longer it will be too thick and may even become as thick as caramel.
  5. Transfer the jam immediately into pre-sterilized jars and let it cool completely before eating. One more tip: If you make large quantities, you can close the jars tightly while still hot and keep them upside down until they are vacuum sealed. This way you can store the jam for several years.

This recipe yields about 900g (31.74 oz) of jam.

This jam is delicious, very creamy, with a lemon taste but very low acidity. It can be used on crackers, bread, and for filling or topping cakes.

We hope you enjoy our recipe and our tips.

Bon appétit!


Watch our educational video now, and if you haven't subscribed to our YouTube channel yet, take the opportunity to do so if you don't want to miss a thing!


Other Tips To Use Lemon


Anise Cakes With Dried Fruit | Old Fashioned Recipe | Rustic Homemade Cakes

In our home we like to make the most of all crops. We have already spoken here on the blog about growing anise and today we will show you how we use anise in cakes, made the old fashioned way. This recipe has a tradition in Luis' family, with some changes made by us. We make it every year to preserve stories and customs, and to recover the genuine flavors of the good old days. 

We will share with you this rustic recipe for anise cakes with dried fruit made in a wood oven, but we also have the alternatives for conventional oven and fireplace oven so everyone can make it. 

Besides anise, this recipe also allows the use of other crops, such as lemon and olive oil.

At the end of the post, also watch our vintage video to see, in practice, the step by step of this recipe.


This dry cake recipe is very interesting to make during the cold weather, but can be made at any time of the year when you feel like...making and eating them!

To delight kids and adults, let's get down to the recipe.


Ingredients

  • 2 medium lemons (zest only)
  • 3 kg wheat flour
  • 1 kg brown sugar
  • 1 TBSP baking powder
  • 3 cinnamon sticks
  • 40g anise seeds
  • 1125ml milk
  • 250ml olive oil
  • Spirit as needed
  • Margarine as needed
  • 6 eggs
  • Nuts at your choice (walnuts, almonds, hazelnuts...) as needed 


Kitchen Tools

  • 1 Zester
  • 1 Large bowl
  • 1 Milk boiler
  • 1 Sieve
  • 1 Kitchen scale
  • 1 Hand mixer
  • 1 Knife
  • 1 Bowl
  • 1 Pastry brush
  • Plenty of molds


Time Needed

We recommend setting aside one afternoon to make these cakes with the family. This is a time consuming but very fun and creative activity, especially to do with children.


Method


Part 1 - Zesting the Lemons

  1. Start by zesting the peel of 2 medium lemons.
  2. Set aside.


Part 2 - The Big Bowl

  1. In a big mixing bowl, add 3kg of wheat flour and 1kg of brown sugar. 
  2. Mix with your hands.
  3. Make a hole in the middle.
  4. Set aside.


Part 3 - The Stove

  1. In a milk boiler, add 3 cinnamon sticks, 40g of anise seeds, and 1125ml of milk.
  2. Boil for 5min.
  3. Separately, heat up 250ml olive oil and turn off the heat as soon as it boils.


Part 4 - Prepare the Dough

  1. In the open hole in the middle of the flour add, alternately, the hot olive oil and the spirit as needed.
  2. Mix all with a spoon (because the olive oil is very hot)
  3. Add the lemon zest.
  4. Mix with your hands.
  5. Add 1 TBSP of baking powder.
  6. Mix again.
  7. Using a sieve, add a little of the milk mixture.
  8. Mix together.
  9. Gradually, add and the remaining milk.
  10. The dough will start to become a little sticky, so you must put some margarine in your hands to mix it again by hand.

From here on, with lots of energy (but really lots!) knead the dough WITH YOUR HANDS! This task must be done by someone with good hand strength so that the dough gets really well kneaded. 

Don't try to put this dough in fancy machines. It may give a bad result!

After some time kneading the dough, you should cut it to see what it looks like inside. It must be lacy and look like bread. The success of these cakes depends on the consistency of the dough.

Once the dough is just right, cover the bowl with a cloth and let sit for 1 hour.


Part 5 - The Eggs and the Molds


While the dough is resting...

  1. In a bowl, beat the yolks of 6 eggs.
  2. Set aside.
  3. Assemble all the molds and grease them with margarine and flour or cover them with baking paper.


Part 6 - Shaping the Cakes

This task can be particularly fun for children, as they can shape the cakes as they wish.

  1. After shaping the cakes, place the dried fruit on top of them.
  2. Brush the top with the egg yolks.
  3. Spread the cakes out on the molds.

And the cakes are ready to go into the oven!


Part 7 - Wood Oven (or others)


Wood Oven

If you have a wood oven, you know that you have to preheat it beforehand. Someone in the family has to take charge of this task while the others prepare the cakes.

Setting the temperature in this oven may not be easy and you have to keep an eye on how well the cakes cook. Ours took only 10 minutes to bake, but the time will always vary depending on the temperature of the oven and the surrounding environment.


Fireplace Oven

If this oven is at 200°C, the cakes may take around 20 minutes to be ready.


Electric Oven

The oven has to be preheated and the baking temperature should be 220ºC. In this oven the cakes may take about 25 minutes until they are ready. The cooking time also depends on the efficiency of the oven, so you need to pay attention.


This recipe gave us 78 cakes. The amount of cakes will depend on the chosen shapes and sizes.

78 cupcakes seems a lot?! Don't worry... they go fast! In milk, in coffee, with tea, for breakfast, as a snack, to share with family and friends ... they're gone in a flash! In addition, they are dry cakes and last for a long time without needing cold storage. They should be stored in a cool, dry place.


And they taste just like they would in the good old days! :)


We hope you enjoy this rustic recipe we shared with you. Make the most of this recipe by spending quality time with your family, working out by kneading the dough, and sharing sweet moments with your loved ones!


Xo Xo from the gardeners,

Ana and Luís


VIDEO - Anise Cakes With Dried Fruit | Old Fashioned Recipe | Rustic Homemade Cakes


11 Tips To Preserve Lemon For a Long Time | Natural Methods | No Additives

Today we are going to talk about lemon! We are going to share how we preserve all parts of lemon at home, without waste and without additives. Those who have a lemon tree and don't know what to do with so many lemons, or those who are gifted with several kilos of lemons by someone in the family who also doesn't know what to do with them, will surely benefit a lot from this post. At the end of the post we also have our educational video where we show the step-by-step process for each preservation method.


When nature gifts us with abundance, creativity must be used! Our lemon tree is always generous and we don't like to waste our organic lemons, so we preserve them in every way we can think of. One must also remember that lemon is one of the anti-inflammatory foods and deserves much care when preserving it.


There are various methods of preserving lemon that include additives such as salt, sugar, seasonings, etc. However, because we like preservation methods, without additives, that preserve the taste of vegetables, we will show you how we preserve all parts of lemon in the most natural way possible. 

IMPORTANT: We can't emphasize enough that the lemon peel should only be consumed if the lemon is organic. For store-bought lemons or lemons from conventional farming, it is highly inadvisable to consume the peel!


#1 Preserving Whole Fresh Lemons

In this method, we put the whole lemons in freezer bags, which we remove the air from with a pump. You can find these bags here. By removing the air from the lemons we are inhibiting oxidation, thus prolonging their shelf life. The lemons can then be kept fresh in the refrigerator and used au naturel for up to 6 months. It is important to put a label with a date to remind of the validity.

To use, simply remove the amount of lemons needed for each recipe and reseal the bag, removing the air.


#2 Preserving the Peel (in slices)

Using a fruit peeler, we remove the peel all around the lemon. This is done carefully, removing only the yellow part in very thin slices, leaving the white part intact. The peels can be placed in boxes or freezer bags and stored in the freezer. It's okay to store them all together because, even frozen, they separate easily.

The peels can then be used to make lemon tea, flavored waters, decorate candies, and make macerations.


#3 Preserving the Peel (in zest)

The zest can be obtained in two ways. The traditional way is to use a zester. The other way is to remove the peels with a fruit peeler and grind the slices in a food processor. This second way is faster and more effective, also leaving the white part of the lemon intact. We flatten the zest in a freezer bag and then remove the air from it to take up less space in the freezer. The bag should be flattened so that it is easy to break/remove only the amount needed at a time.

The zest can then be used in various types of cooking, candies, ice cream, and even natural soap!


#4 Preserving the Juice

To make the juice, simply use a juicer. We put the juice into ice cube molds and put them in the freezer. After freezing, we pass the cubes into freezer bags, remove the air, and put them back in the freezer.

The cubed juice can then be used to make lemonade, flavored waters, cooking, and even other curious things like natural hair removal wax and natural bee food!


#5 Preserving the Pulp

After squeezing the juice, there is always pulp left. The pulp can also be frozen in molds, small or large, depending on what you are going to use it for. 

Both the clean pulp and that pulp that still contains seeds can be preserved for later use in various ways, such as making lemon soap, filling cakes and doing other creative cooking.


#6 Preserving the Mesocarp - white part (in gel)

Many people throw away the mesocarp, because they think it has no use...but it does! Mesocarp is rich in iron, magnesium, calcium, and zinc. Its gel texture contains soluble fibers that decrease appetite and contribute to satiety, thus helping with weight loss. Contrary to popular belief, its flavor is actually quite pleasant and much less acidic than the peel.

To preserve the mesocarp in gel, we cut the white parts into small pieces and put them in the food processor until they become zest. Then we put the zest into a strainer bag and squeeze. This task is time consuming and requires hand strength. We place the gel in a glass jar and store in the refrigerator. It can be stored up to two weeks.

Mesocarp gel can be used as a natural thickener for jams and other sweets and can also be eaten by the spoonful...but only a little bit at a time!


#7 Preserving the Mesocarp - white part (in zest)

The mesocarp can also be stored in zest to be processed later. It can be frozen in individual portions, in larger molds or in flattened freezer bags, so that it's easy to break and remove just the necessary doses for each use.

The shredded mesocarp can then be used to make gel, fill cakes, and even mix into yogurt.


#8 Preserving All Parts (peel + white part + pulp)

To preserve all parts: peel (epicarp), white part (mesocarp) and pulp (endocarp), we cut the lemons into small pieces and put them in the food processor until they are all well shredded with a kind of paste-like consistency. We then put it in individual portions in large molds, freeze it, transfer it to freezer bags, and keep in the freezer again.

Preserving all parts of lemon is particularly useful for making natural lemon soap or lemon dishwashing detergent. This mixture can also be squeezed into a strainer bag to use in any recipe that requires lemon pulp or juice.


#9 Preserving in Slices (frozen)

Another way to preserve lemon is to slice it, removing the seeds. The seeds can then be used to germinate and grow new lemon trees. We store the slices in boxes and keep them in the freezer. We do not recommend storing in freezer bags as the slices will stick together too tightly and it may be difficult to separate without breaking them.

The slices can then be used to make flavored waters and decorate drinks.


#10 Preserving in Slices (dehydrated)

For this method of preservation, we cut very thin the slices. We remove the seeds, place the slices on the oven rack, and leave them in the oven for about 5 hours at 80°C. The dehydration time will always depend on the efficiency of the oven. Once dehydrated, we store the slices in an airtight jar so that they remain well dried and no moisture can enter.

The dehydrated lemon slices are so beautiful that they can be used to decorate candies and other baked goods, as well as be consumed directly.


#11 Preservation in Powder

After dehydration, the slices can also be reduced to powder. We grind the slices in a coffee grinder and then use a sieve to make the powder very fine. This task should be repeated until everything is processed. We store the powder in an airtight jar. When kept well dried the powder can be stored for more than a year.

Lemon powder is quite versatile and can then be used to sprinkle various types of cooking and desserts. 


And this is how we preserve lemon at home! We are sure you will find our tips very useful! 


Take a look at our video where we show the step-by-step instructions for each of these preservation methods. If you haven't subscribed to our Youtube channel yet, take the opportunity to do so if you don't want to miss a thing!


VIDEO - 11 Tips To Preserve Lemon For a Long Time | Natural Methods | No Additives


How to Make Fruit Liqueur | How to Make Jam with the Leftover Fruit of the Liqueur

There are many ways to preserve fruit, but none will be as noble as liqueur! In addition to keeping for many years, it is an excellent gift to give to family and friends, as well as for personal consumption, and can be enjoyed after a meal.

The liqueur we made for this post was made with organic black figs from our trees, but the same method can be followed for several other fruits. In addition to the liqueur, we also show you how to make jam with the fruit leftovers. Nothing is lost...

At the end of this post, check out our educational video where we show you how to make the liqueur and the jam step by step.


So let's see first how to make the liqueur.


Ingredients


  • 1Kg Black figs
  • 1L Cachaça (it does not have to be a specific brand, but it must be of good quality)
  • 1L Water
  • 1Kg Brown Sugar
  • 2 or 3 Cinnamon sticks (optional)


Materials


  • 1 Large glass jar with lid
  • 1 Sieve
  • 2 Large containers
  • 1 Tablespoon or potato masher
  • 1 Wooden spoon
  • 1 Large pan
  • 1 Funnel
  • Pre-sterilized glass bottles to store the liqueur


How To Do It


1st Phase: Fruit Maceration


  1. Harvest the figs. If it is not possible to make the liqueur on the same day, the figs must be refrigerated.
  2. Cut the figs into 4 pieces and place them inside the glass jar.
  3. Cover the figs with Cachaça.
  4. Cap and shake the jar well.
  5. The jar should be kept in a cool, dry place for 30 days (maceration time).
  6. During the 30 days the jar must be shaken at least once a day. The ideal is 3 times a day.


2nd Phase: The Liqueur Preparation


  1. After 30 days, use a sieve to strain the liquid into a large container.
  2. With a spoon or potato masher, squeeze the fruit to remove as much liquid as possible. Reserve the fruit.
  3. In a pan, add 1kg of brown sugar and 1L of water. Mix and boil for 10 minutes. Here you are preparing a syrup that will add sweetness to the liqueur.
  4. Once ready, add the fig liquid to the syrup.
  5. Mix well.
  6. Optionally, cinnamon sticks can be added to the mixture and stirred for a few minutes, removing the sticks before pouring the liqueur into the bottles.
  7. Use a funnel to store the liqueur in glass bottles.


Now, let's see how to make jam with the fruit leftovers.


Ingredients


  • The figs used to make the liqueur
  • 250g Brown sugar


Materials


  • 1 Pan
  • 1 Wooden spoon
  • 1 Hand blender
  • 1 Tablespoon
  • Pre-sterilized glass jars to store the jam


How To Do It


  1. Place the fig leftovers in a pan.
  2. Add 250g of brown sugar.
  3. Mix well.
  4. Let simmer for 20 minutes.
  5. After 20 minutes, mix with the hand blender.
  6. Stir a little.
  7. With a spoon, immediately transfer to the glass jars and cover.
  8. Keep the jars upside down to create vacuum (you know it's under vacuum when you hear the lid clicking and it gets sucked down). If a jar doesn't vacuum, it should be stored in the fridge and consumed first.
  9. Both liqueur and jam must be stored in a cool dry place.


This sweet is not exactly like a jam. It is thicker and also has a slight Cachaça flavor, but it no longer contains alcohol, as it evaporates during boiling. It's a great sweet to fill cakes, but also to put on cookies or mix in yogurt.

And so, nothing is lost, everything is transformed!


If you make these recipes at home, feel free to share experiences, here on the blog or on our Youtube channel!


Here is our video!


How to Make Fruit Liqueur  | How to Make Jam with the Leftover Fruit of the Liqueur